Tuesday, February 28, 2023

How to Throw a Pokémon Party (part 2)


In part one of how to throw a Pokémon party, I shared how we made our invitations, photo booth and mini pokeball pinatas.   

In today's post I am going to talk about the games, cake and goody bags.  


One of the first games we played was Pokémon Bingo. I found a website where you can make free custom Bingo cards for kids, and I am so happy that the site is still available now. It is called dltk-kids.com. There are all kinds of cool ideas for kids on this site, but the link will take you to the Bingo cards.  I made markers for the game out of red, yellow and blue squares of cardstock. After a few rounds of Bingo, we went out to the backyard for Pin the Tail on Pikachu. 


**this posts has affiliate links 

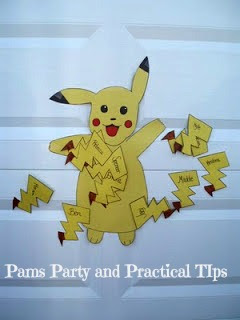
  I drew a Pikachu on a piece of yellow poster board and gave everyone a tail.  Looking at this photo, I think that many Ben and Joey were peeking when we played.  LOL! 


Before the party, I did a little prep work. I had my son pick out his favorite 20 Pokémon, and then I put together a mini lesson to teach a little bit about each character.  There is a reason for the lesson.  We were going to play a game with those 20 characters called "Got to Find Them All" 


Some more prep work that I did before the party was to make Pokeballs out of plastic ball ornaments that have the two halves snap together. I painted one side white, the other side red, and added a black strip between the two colors.  Unfortunately I was so busy at the party,  I did not get a photo of a finished Pokeball. I made enough Pokeballs, so each of our guests would have three of them. 


I had figured out the fairest way for the kids to figure out which Pokémon they were going to look for.  We turned on some Pokémon music, and played Pass the Pokeball. When the music stopped, if you were holding the Pokeball, you got to keep it.   We did this until everyone had three Pokeballs. While we were doing other things, I had some helpers hide small printed pictures around our entire yard of all of the Pokémon we had learned about in our lesson. 


  At the start of the game they opened their Pokeballs to see which Pokémon they were looking for.  They had to find three matching pictures for each of their Pokémon, which was nine pictures total.  It took them quite awhile to find them all, but they loved it. I had a few extra Pokeballs, so some of the quickest trainers helped me find those too.  If you look closely, hanging from the swing set is a number 8 pinata.  I had the kids all sit in the grass while it was being hit. This helped keep kids safe from getting hit by the stick, and to make it as fair with the amount of candy they picked up when the pinata broke.

After the games were done, we went inside for Pokémon themed snacks and cake.  I do not remember what snacks we had, I would have to go through several boxes of photos and photo albums to find out.  


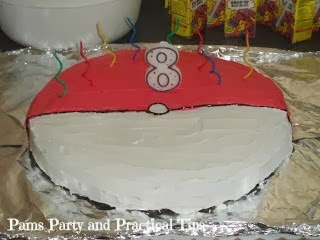
The cake was pretty easy to make. I made a giant circle cake. (I think it was a deep pizza pan)  I frosted it red and white and then used a tube of black gel to make the center line. 

I used these colorful party giftbags for their goody bags. I wrote Pokémon Master, and then their first name on the bags so they could tell them apart.  In the goody bag they put all of their pinata candy (I had extra for those who did not get as much), their pokeballs, and some Pokémon stickers.  They also got to keep their trucker hat.  

I love how many cool Pokémon party items are available now.  


I so would have bought these Pokémon themed gift boxes if they were available back then. 


This Pokeball party plate set is also really cool.  


One of the few Pokémon themed items that were available for our party were party plates similar to these.  I only bought one pack, and then had extra plates in solid colors. 

There are so many fun Pokémon party items on this Amazon page that it would take me hours to go through it all. Instead I am just going to link it here,


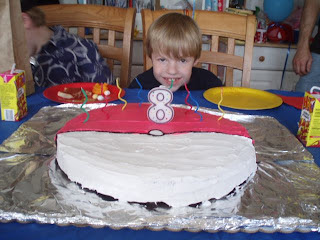
This was definitely one of my son's favorite party themes. 


Read More »

Monday, February 27, 2023

How to Throw a Pokemon Party (part 1)


 Happy Pokémon Day! 


Did you know that February 27 is Pokémon Day?  I have to admit that I just found out today.  My kids loved Pokémon while growing up, and this is the first I have heard of it.  According to Google today is designated as Pokémon Day, because the first original games were released on this day 27 years ago in 1996. 

All three of my kids really liked Pokémon, but my son liked them the most.  He liked that so much that he requested to have a Pokémon themed birthday party. Today there are Pokémon party items everywhere, but when he wanted to have his party (mid 2000s) there were very few Pokémon party supplies. I had to make my own.  It was not until a couple of years later that Pokémon party items were more main stream.  If you have seen my party theme page  on the top of my blog you can see that was usually the case.  My kids often wanted parties that I had to make a lot of my own party supplies.  

Our Pokémon party was one of my son's very favorite, so I am going to share again how we put it together.  (you can see the original post here.

The first thing I had to do was make an invitation.  There were fun to make and the kids LOVED them. 

**this post contains affiliate links 


To make a Pokeball invitation, you will need two large white cardstock circles, and one red one in the size of the invitation you would like.  You will also need a small white circle, and two brads. 

You will leave one of the circles in one piece. That intact circle will be the back of the invitation where you will write the information. 

This is what we wrote.. 

Please come to my Pokémon party!
Date and Time
RSVP to Professor Mom at ### - ### - ####

 The next step is to make the front of the Pokeball.  Cut both the 2nd white circle, and the red circle in half. Attach the red to one side of the circle, and the white to the other half with small brads.  The red half is the top of the invitation. You will then attach the small white circle to the red top half, allowing a little bit of the circle to overlap to the white half. (see the picture) Do not put any adhesive on the overlap, because we want the Pokeball to be able to open.  On the red half we wrote the name of the child we were inviting and the words, I choose you! 


Back in the I made the Welcome Trainers sign out of poster board.  If I had to do it again, I would use wooden circle sign from the Dollar Tree.  When we had this party we did not even have a local Dollar Tree, so I used when I had on hand. 


When I used to host my children's parties, we always had an area where each of the guest would pose with a prop from our theme,  so we we had memories of each guest. In this picture my son is posing with his Pikachu, wearing a red trucker hat that I bought from Oriental Trading Company. I don't think they have the same hats we bought back then, but they now have a ton of Pokemon Party Supplies that you could use for your party. 

You can see in the picture that I had made small Pokeball piñatas and used them as party decor. 


The base of the Pokeball is a round balloon. I used a basic paper-mache technique on the balloons. I made several layers and placed them in disposable plastic bowls to dry. 


Once they were dry, I painted them entirely white first and then added the red half. I painted a black line around the two halves and used a small black and a small white cardstock for the closure.  My son loved them so much, he kept them for years to come. 


If you prefer to buy a pinata instead of making them, here is one I found on Amazon.

I will be sharing more about our Pokémon party in tomorrows post I will share our games and how to make mini Pokeballs that the kids were allowed to keep as party of their goody bags.  


Read More »

Saturday, February 25, 2023

It's Part Time! Let's Dare to Share!


It's Friday night, and you know what that means.. 
It is time to Dare to Share!

    First an update on what I shared last week about my son being a student at Michigan State and the aftermath of the horrible shooting. (You can read more about it in my post When the unthinkable happens ) I have to say even though I am a full fledged Buckeye, and only temporary Spartan on all days but game day, Michigan State, parents and community had a wonderful response.  Last Sunday kids came back to campus to go back to classes on Monday. The kids who were not ready to come back were able to attend online if they wanted to.  They also had a few other options for those who did not want to finish the semester.  Parents, and the surrounding communities were there to welcome the students back with open arms. There were people on campus with gifts like meals, and stuffed animals.  Therapy dogs were visiting campus for several days.  The university set up free counseling for any staff and student who wanted  it, and had a hotline that could be called any time they needed to talk.  Many of the professors adjusted the rest of the semester, so the week out of school did not affect their grades. I know there are a mix of kids who want to get back to school and feel normal again, and there are kids that are too scared to go back.  My son is in the first group. He was ready to go back.  Most of his classes were online this week, because they were also hit with a bad ice storm over the last few days which made travel and walking outside difficult. So while this horrible act was unthinkable, the last week and a half has been full of love and support on campus.  

    Just as things were looking up for my son, we were hit with some bad news yesterday about one of our dogs. On of our sweet girls started to have a bloody nose on Wed.  We tried to get her in to the vet that night, but there were booked up. We were able to get in the next day. (yesterday) When we saw the vet she was very concerned. She said she had a few ideas what it could be, but she had to do a blood test to find out. When she came back in she had two pieces a paper. They had done the test twice to confirm the results.   Our poor baby did not have platelets to stop her bleeding, that is caused by an autoimmune disorder.  All of her organs and weight look great, but without platelets her diagnosis is not good. We do know she had platelets last summer, because she had to have a surgery, so this is a new thing.  She sent us to an emergency vet about 30 minutes away , because they might be able to do more than our local vet.  When we got there, they were waiting for us and we saw the vet very quickly.  Unfortunately, when that vet told us the cost of the treatment we knew we would not be able to do it.  Our dog would have to be admitted for a three day hospitalization and have a blood transfusion.  That first part of the treatment would cost between 4,500 and 6,500. She mentioned that often dogs who have this disorder, need 2 or 3 transfusions over a period of time, with only a 75% success rate. That means our final cost could be up to $20,000.  She understood why we just could not do that treatment, so we asked if there were any other alternatives.  She mentioned we could try a cocktail of meds, and isolate her from her doggy sister for the next few weeks.  She needs to basically be in a bubble so she did not get hurt in anyway, because it would cause bleeding that would not stop, outwardly and internally.  Even though that was not a great option, we are doing the latter treatment.  Hopefully she will begin to start producing platelets again. If you are a praying person, please for a miracle for our sweet girl.  

Ok, now that I have completely brought the mood down, let's try to get it back up.  

I did manage to do a post for St. Patrick's Day this week, which are how to make St. Patrick's Day Marshmallow Pops.  I made them a few years back, but it is still one of my favorite treats to make. 

Do you have something that you would like to share?  It's time to get the party started. Link up and HAVE FUN!! 


You are invited to the Inlinkz link party!

Click here to enter
Read More »

Thursday, February 23, 2023

St Patrick's Day Marshmallow Pops


These leprechaun marshmallow pops are one of my favorite 
St. Patrick's Day treats that I have made.  


I made these awhile back, so the pictures are not the greatest, but you can see how I made them.   

For each leprechaun you will need three marshmallows, two of the regular size, and one mini. 


**this post include affiliate links to the items I used to make the Leprechaun pops

Place the bottom marshmallow upright on a lollipop stick , and coat it with Wilton green candy melts .  Leave a bit space on the top of the stick, because you will be adding another marshmallow for the head.  


The best way to dry your pop is by standing it up in a floral foam ring or block.  You can find several shapes and sizes at the Dollar Tree . In this picture you can see how to place the top marshmallow on its side, which will be the leprechaun's head.


I used edible food markers  to draw on the face can not remember which brand I used, but I think this dual tip set that is highly rated looks really good.  


I used orange squeezable frosting in a bottle to add his beard and hair. 


The last step was to make his hat.  I put a mini marshmallow on a toothpick and dipped in the green candy melt.  Once there were dry I added them to the top of his head with a little bit of melted chocolate to act as glue. 


A fun way to display the leprechauns is in a pot of gold.  I made this with a black pot from Halloween, a little bit of floral foam, and glass accent gems from the Dollar Tree painted gold. 


These were not only fun to make, but yummy to eat! 


I have two fun games you can play while you eat your leprechaun pops.  One is this find the Find the Leprechauns Treasure Hunt.  You use the clue to find the three hiding leprechauns.


In this St. Patrick's Day game you look for the Pot of Gold.  Both games are a lot of fun.  
 

Read More »

Friday, February 17, 2023

It's Time to Dare to Share!

It is Friday night, and you know what that means.. 
It is time to Dare to Share! 


I had planned to share other things on the blog this week, but this week has been a difficult one for me.  I wrote my post When the Unthinkable Happens on Wednesday night. If you have seen the news this week, you saw what happened at Michigan State on Monday night.  My son is a student at  Michigan State.   While my son was safe at his apartment and not on campus that night, he lives pretty close to Berkey Hall. My mom called me in a panic to tell me when she saw the breaking news, to see if he was okay.  We turned on the news from Michigan online, and watched it for hours. It was so surreal to see what was going on that night.  I know so many kids who go to Michigan State, and one of my friend's has a daughter who teaches in Berkey Hall.  She normally teaches evening classes, but was not teaching that night. Thankfully, everyone I know is okay, it is  just so hard processing what happened. My emotions have been all over the place this week.  The college is offering counseling to students and staff. They have also offered resources to parents who need it.  The kids that are ready will be going back to class on Monday. My son says he is okay.  It is kind of hard being four hours from my son this week, but I did see him last weekend and have talked to him every day this week which has helped. 


I do have something fun to look forward to this weekend.  We are having another Dollar Tree craft class tomorrow. I am not teaching this time, but look forward to learning more about cookie decorating.  I will hopefully be sharing more about it on the blog. 

I would like to see what you have to share, so let's get this party started.  Link up and HAVE FUN! 


You are invited to the Inlinkz link party!

Click here to enter
Read More »

Wednesday, February 15, 2023

When the Unthinkable Happens


Trigger warning: In this post I will be sharing about what I experienced this week as a parent of a Michigan State student.. 

    If you follow me on Instagram you may have seen this picture in my stories.  It is a flag my son received when he was accepted to Michigan State University.  If you followed me from a long time ago you may remember my son Kyle from his kids cooking series Cooking with Kyle.  He is grown up now, and  currently a student at Michigan State. 

    If you have seen the news in the last few days, you should have heard by now that they had a mass shooting on campus on Monday night.  Finding out your child could be in danger while you are hours away is every parents nightmare.  Thankfully, I was texting with my son when the chaos started, so I knew immediately he was in a safe location.  He was at his apartment that was a quarter to half mile from the lecture hall where the first shooting occurred. 

     I did not hear that something was happening from Kyle, but from my mom who lived a few states away. She saw it breaking on the news, and immediately called me in a panic to ask if I knew where Kyle was. She told me that she saw on the news that there was an active shooter situation on campus.  She breathed a huge sigh of relief when I mentioned that I was texting with him, and that he was at his apartment, and not on campus at that time. When I mentioned to Kyle that grandma had just called me about a situation that was happening on campus, he said that he received an email to shelter in place.  He did not really know much about what was going on, since he did not have the news on yet. 

    I moved from Michigan to Ohio last summer, so I had to watch the news from a TV station in Michigan online.  Watching what was happening live was so surreal.  My brain could not process what I was seeing. I recognized buildings and street names that I had been by several times as recently as this past weekend.  The more I saw, the more anxious I became. While I knew my son was safe from what was happening on campus, they had no idea where the shooter was for a few hours.  At that time he could be anywhere.  I also started hearing from friends through text and on Facebook that they were finally in contact with their children.  They were so scared that they did not know their kids or relatives were safe right away.  I have several friends who have children that go to school or teach on campus.  One of my friends has a daughter that teaches at that very hall!  

    I could not go to bed that night, not until I knew that the shooter had be found. It was around midnight when they finally said that the shooter had been found, and that he was no longer alive.  He was found on a road that I frequently take when I am in town. I  stayed up late into the night, and watched several news conferences trying to make sense of a senseless situation.  The man who caused all of this chaos, panic, and grief didn't even have ties to Michigan State.  There was no reason for him to even be there on campus. (at least that we know of at this time)   He just randomly shot at innocent students who were there to get an education. It really could have been anyone. It could have been my son, or my friends' children.   While I know my son is safe physically, how will he deal with this emotionally?  Will he feel safe when he is back on campus?  I know I have been struggling to process  all that has happened, so I can only imagine what the students are going through.

    The Michigan State campus has been stepping up to help the students.  They have canceled classes for the week, and are offering counseling for students and staff in person and online. I am sure many people are going to need to talk to someone.   Since there are no classes for the week, I know many students went home to be with their families. I was just in Lansing last weekend and had the chance to hug my son.  We have talked on the phone every night since. Hopefully, we will continue that for awhile.  

I can't stop thinking of the eight families who had their lives changed forever Monday night. Three of the students have passed, and five others are in critical condition at a local hospital.  I have been praying for those families, and for all of the Michigan State students. This was definitely a traumatic event to go through.  I pray for the parents of students who are now feeling anxious, and struggling to process what might have been like me. 

I know we will get through this.  I know eventually we get back to day to day life.  Until then Spartan Will!  (I am a Buckeye who is a temporary Spartan for my son, every day but game days) 

Read More »

Saturday, February 11, 2023

Its Dare to Share Saturday

It's Friday night, and you know what that means.. 
It is time to Dare to Share! 

I am finally feeling much better this week.  This is our weekend to visit my friends and my now adult kids in Michigan.  Tonight we went to the dance that we like to go to for the Valentines Day Dance tonight, which was a lot of fun.  


This past Sunday we were able to go visit Jurassic Quest  when they made a stop in Ohio.  If you have kids who like dinosaurs, they will love this event.  You can read more about our visit why you should take you kids to Jurassic Quest.


I also shared one last faux food post, how to make faux candy decor.  I made large suckers and cotton candy that would look cute for a candy themed party or as holiday decor.  They are super easy to make.  I am thinking of doing a candy themed Christmas tree later this year. 


Speaking of holidays, it is almost Valentine's Day. If you need any last minute classroom Valentines, or a fun Scavenger Hunt come check out my Etsy Shop  I have sold several of the scavenger hunts so far, which is a new product this year.  

Well it is getting late, so I better get this party started.  Link up and HAVE FUN! 


You are invited to the Inlinkz link party!

Click here to enter
Read More »

Wednesday, February 8, 2023

How to make faux candy decor


My last faux food tutorial is how to make faux candy to use as decor.  These are so easy to make, and look great as props for holidays, parties and more. 


** This post also contains affiliate links and I will be compensated if you make a purchase after clicking on my links.


I used these products from the Dollar Tree and Walmart 

Chenille Yarn in cocoa brown and pink

Stryofoam circles (2 pk) 

Dowel rods (Walmart) 


Crafters Square glass beads


Essentials Microfiber Mop Pad


I attached the dowel rods to the styrofoam circles, so they looked like large suckers.  Then using my Gorilla Duel Temp Glue Gun, I glued the chenille yarn on one of the styrofoam circles in a circular motion. I love this yarn, it really is the color of chocolate. 


Before adding the pink ribbon to the other circle, I painted it pink first and then glued on the yarn.

While I do not have a picture of the next step, you can attach the glass beads in between the yarn circles with hot glue if desired. If you don't have glass beads, there are many things at the Dollar Tree that would also work candy/sprinkles.  I left mine  suckers plain, because did not have enough beads on hand, and  I wanted to show them at the craft class I taught at the library.


I finished the dowel rods  by painting them white, and then  wrapping them with ribbon I had on hand.  I can't decide if I like the thin or thick ribbon best.


Faux cotton candy is also so easy to make.   The Dollar Tree mop pad has a texture that is similar to cotton candy.  I painted it pink, and allowed it to dry. I then rolled it around the dowel rode and glued it in place with my glue gun. 


I currently have mine out for Valentine's Day decor, but wouldn't they look cute on a candy themed Christmas tree or at a Candyland themed party.  Happy crafting! 


Read More »

Monday, February 6, 2023

Why You Should Take Your Kids To Jurassic Quest


This past weekend Jurassic Quest visited Dayton, Ohio.  Jurassic Quest is an interactive dinosaur exhibit that is traveling the country.  There is so much to see and do Jurassic Quest.  A lot of the activities are geared more for kids under 10, but older kids, and adults will enjoy it too.  We had the chance to check out this great event thanks to USFAMILYGUIDE.


When you first walk in, it feels like you are in prehistoric times.  There is an entire section on moving dinosaurs of all kinds.  We really enjoyed this section, there was so much to see.


I am not a dinosaur expert, but it seemed like there was representation for pretty much every kind of dinosaur.  In this area you could read information about the dinosaurs, and watch videos from the Jurassic Quest experts on monitors.  


There are also a few photo op areas, like being in a dino egg, or a T-Rex's mouth.  


If you would like to learn about dinosaur fossils, they have some actual fossils to look at, and an expert there to answer questions. 


Do you ever wonder what it might be like to ride a dinosaur? They have two different types of dinosaur rides with many different dinosaurs to ride.


For the littlest visitors there is a dinosaur themed play area.  There were so many activities for kids to do such as inflatables, a fossil dig, excavation station, and Jurassic Jeeps. 


One of my favorite areas was where you can meet the walking dinos.  At designated times throughout the day, a young raptor greeted the guests.  This was a lot of fun for the kids and adults alike.   Also walking around the event were trainers with baby dinosaurs.  While we did not meet one up close, we did get a glimpse of a little guy. 


When you are done visiting, and if you would like to take a part of Jurassic Quest home with you, they had a very nice souvenir area. The biggest seller, and probably cutest souvenir are the walking dinosaur balloons. 

We definitely enjoyed our afternoon, and I recommend going if your kids like dinosaurs.  They have the schedule of upcoming locations at on their website JurassicQuest.com.  

If you find that a event is coming to your area, you are in luck!  My readers can get 20% off their tickets by using the code USFAM.  

If you have gone or plan on going, let me know in the comments.  


Read More »