

Happy Pokémon Day!
Did you know that February 27 is Pokémon Day? I have to admit that I just found out today. My kids loved Pokémon while growing up, and this is the first I have heard of it. According to Google today is designated as Pokémon Day, because the first original games were released on this day 27 years ago in 1996.
All three of my kids really liked Pokémon, but my son liked them the most. He liked that so much that he requested to have a Pokémon themed birthday party. Today there are Pokémon party items everywhere, but when he wanted to have his party (mid 2000s) there were very few Pokémon party supplies. I had to make my own. It was not until a couple of years later that Pokémon party items were more main stream. If you have seen my party theme page on the top of my blog you can see that was usually the case. My kids often wanted parties that I had to make a lot of my own party supplies.
Our Pokémon party was one of my son's very favorite, so I am going to share again how we put it together. (you can see the original post here.
The first thing I had to do was make an invitation. There were fun to make and the kids LOVED them.
**this post contains affiliate links
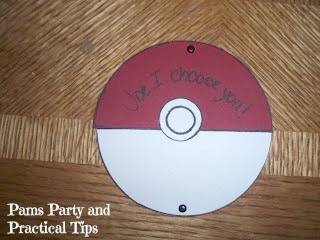
To make a Pokeball invitation, you will need two large white cardstock circles, and one red one in the size of the invitation you would like. You will also need a small white circle, and two brads.
You will leave one of the circles in one piece. That intact circle will be the back of the invitation where you will write the information.
This is what we wrote..
The next step is to make the front of the Pokeball. Cut both the 2nd white circle, and the red circle in half. Attach the red to one side of the circle, and the white to the other half with small brads. The red half is the top of the invitation. You will then attach the small white circle to the red top half, allowing a little bit of the circle to overlap to the white half. (see the picture) Do not put any adhesive on the overlap, because we want the Pokeball to be able to open. On the red half we wrote the name of the child we were inviting and the words, I choose you!

Back in the I made the Welcome Trainers sign out of poster board. If I had to do it again, I would use wooden circle sign from the Dollar Tree. When we had this party we did not even have a local Dollar Tree, so I used when I had on hand.
.jpg)
When I used to host my children's parties, we always had an area where each of the guest would pose with a prop from our theme, so we we had memories of each guest. In this picture my son is posing with his Pikachu, wearing a red trucker hat that I bought from Oriental Trading Company. I don't think they have the same hats we bought back then, but they now have a ton of Pokemon Party Supplies that you could use for your party.
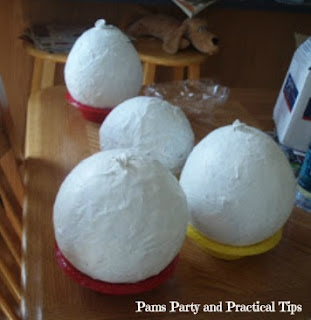
You can see in the picture that I had made small Pokeball piñatas and used them as party decor.


The base of the Pokeball is a round balloon. I used a basic paper-mache technique on the balloons. I made several layers and placed them in disposable plastic bowls to dry.

No comments:
Post a Comment
I would love to hear from you!