Showing posts with label pumpkin crafts. Show all posts

Thursday, September 5, 2024

Easy Plastic Pumpkin Pail Crafts


Now that Spooky Season is here, plastic pumpkins are available for not only Trick or Treating, but also for crafting. 


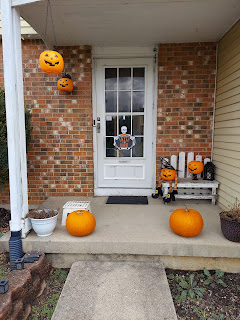
I bought four plastic pumpkin pails, and used them in different ways to decorate our front porch. 


** This post also contains affiliate links and I will be compensated if you make a purchase after clicking on my links.

The first pumpkin craft I made was the sitting pumpkin witch. I found the supplies I needed from the Dollar Tree. You will need two sets of witch legs, and a witch hat.  I found everything for $1.25 each.  


One set of the witch legs will be used for the pumpkin's legs. I filled them with a plastic bag to give them a little bit of dimension. 


Since they do not sell witch arms, I had to alter the second set of witch legs.  I cut out the shape of mitten out of the felt shoes, so it looked like the picture above. 


I also filled the arms with plastic bags to give them dimension as well. I attached both the arms and legs to the pumpkin with hot glue.  


 The last step was to remove the plastic handle and glue on the witch hat. I only glued it about 2/3 of the way around though, because you want some space to add a tea light or push light. Both types of lights are available the Dollar Tree. 


A very simple way to add some Halloween fun to your porch is by making a Halloween lantern.  Dollar Tree has planter chains near their floral section for $1.25.  I am not sure if they are available all year or if they are seasonal.


We hung this pumpkin on the front of our porch and added a Dollar Tree Strobe light that changes colors.


I don't have a good picture of pumpkin we placed around the light fixture on our porch. First we cut off the handle, then cut down the back of the pumpkin.  Depending on the size if the light fixture you will need to remove the bottom of the pumpkin and some of the back so that it fits around your light fixture. 


The last pumpkin craft that I made is to make a pumpkin head candlestick.  I found a black pillar candlestick  at the Dollar Tree and glue it to the bottom of the pumpkin.  I also added a gem spider from the Halloween party section. 


If you order from DollarTree.com, they are offering Free Shipping up to $50 through Sept 7th with the code FREESHIP.   If available you can also have items shipped free to your local store!

Happy Crafting! 


Read More »

Monday, October 16, 2023

Easy Pumpkin Pail Crafts


Did you know that those inexpensive  Halloween candy pails, actually can be used for many things and not just to collect candy. 

This past weekend, I used some of those pails to decorate our front porch. 


** This post also contains affiliate links and I will be compensated if you make a purchase after clicking on my links.

I think this pumpkin witch is my favorite. In addition to a pumpkin you  will need a couple of items that can be found at the Dollar Tree


You will need two sets of hanging witch legs, and a witch hat. 


Since they only sell with legs at the Dollar Tree, and not witch arms, we will have to alter one of the set of legs. 


The legs are sold hanging on a ring.  Cut the legs off the ring at your desired length for your pumpkin witch. I left my witch legs on the longer side. 


To give the legs some dimension, I stuffed each one with a plastic bag. (I have plenty of Dollar Tree bags from shopping there so much. LOL)  


It is pretty easy to make the hands.  I cut a hand shape out of the felt shoes.


Once all for limbs were stuffed, I hot glued them to the sides and bottom of the pumpkin. 


The last step is also pretty easy. Cut off the plastic handle, because we will not be needing it.  Place hot glue around 1/2 to 2/3 of the rim of the pumpkin. The reason why you do not put it around the entire rim is you want to leave enough space under the hat so you can place a light inside, and be able to turn it on and off.  


I left the unglued portion at the back of the hat.  


Another really easy craft is to turn one of the pumpkins into a hanging lantern.  


The first step is to cut off the plastic handle. I made the hole a little bit bigger, so I could add a hanging plant chain.  I found the chain in the garden section of the Dollar Tree.  


The chain actually had three hanging pieces to hang plants.  Since I only needed two pieces for the two holes, I removed the third piece. I am saving it in case I need it for something else later.  


I originally used a flameless candle as my light source but I wanted it a bit brighter, so I put in a push light from the electronics aisle. 


The last craft is my pumpkin votive. I was recording these crafts for a reel, and realized after I was finished that I did not have still photos to post on the blog from when I was making it.  I glued the pumpkin and a gem spider onto a black candlestick you can sometimes find in the candle aisle. I placed a flameless candle inside the pumpkin.  If you would like to see a video, you can see it on my Instagram here.


While we will still have more decorating to do before trick or treat night, being greeted by all the smiling pumpkins on our porch makes me happy. 

Read More »

Friday, August 11, 2023

Dollar Tree Pumpkin Crafts


It's been a busy week, but I still  wanted to share a new post this week.  Mid August is such a weird time. It's still summer, but fall is just around the corner. Its 80s degrees, but I'm so excited about football season.  There are people who refuse to start thinking of Halloween, and others who were ready to decorate yesterday.  I am one that does not want to summer to end, but I am also excited about all the Halloween items in the stores. I have already started picking up items to put out in about a month or so.  

** This post also contains affiliate links and I will be compensated if you make a purchase after clicking on my links.

Since the Dollar Tree craft pumpkins are back in orange, white, and black,  I thought it would be a good time to post about my pumpkin gang again.  If you are not able to find the pumpkins in stores, they are currently available on the Dollar Tree website in quantities of only 4!!  You can also have them shipped to your local store for FREE


For the last several years, I have used Dollar Tree pumpkins to create different pumpkin characters that I like to call the Pumpkin Gang.  There were a few years when I lived in apartment that I did not have the room to put them out. Now that I am living in house again, I am so looking foward to decorating again this year.  If you would like to see how to make one of the pumpkins, I am linking to the post with directions under each photo.  


                                                                  Mummy Pumpkin


I have a few ideas on which pumpkins I would like to add this year.  I am not going to mention what they are yet, just in case it does not happen.  :)   Happy Crafting! 


Read More »

Monday, October 5, 2020

Splatter Screen Mesh Pumpkin from Dollar Tree Items


I finally had the chance to craft this past weekend.  I have  wanted to make this splatter screen pumpkin made with Dollar Tree items for quite awhile.  For most of August, I could not find the splatter screens.  I checked several Dollar Trees on my vacation all around Michigan. I also checked many of the stores in my area.  They were out of stock at every store.  Then one day, all of the stores got more in stock and now they are available everywhere again. 

** This post also contains affiliate links and I will be compensated if you make a purchase after clicking on my links.


To make this craft, you need three splatter screens, three rolls of orange meshorange tinsel pipe cleaners or wire and some harvest themed ribbon of your choice. 


The handles of the splatter screen can easily be removed with a screw driver.  To make the pumpkin shape, start by overlapping two of the screens by a few inches and secure with either pipe cleaner or wire. 


Center and layer the third screen over the other two and secure with pipe cleaner or wire.  


Start wrapping the mesh on one of the other screens securing it on the back side with pipe cleaners cut in half.  Place the pipe cleaners about an inch apart.


Continue wrapping and securing the mesh until the entire screen is covered. It should take a little over 2 rolls of mesh.  I decided to finish the entire third roll and cover the pumpkin with another layer. 


To make the bow, I layered three different fall theme ribbons. I folded each ribbon three times on each side.  The bottom layer was a little bit longer than the middle, and then the middle was a little bit longer than the top.  I secures all three ribbons with a pipe cleaner.  To make tails for my bow, I also secured one long piece of folded ribbon to the back of the bow using the same pipe cleaner. 


Once all the ribbon is secured with the pipe cleaner,  gently pull out the ribbon loops and fluff them a bit.  When you like how it looks, used the pipe cleaner to secure the bow to the top of the pumpkin. 


This pumpkin is pretty light weight and can easily be hung on the wall, door, or even in a wreath.   


Read More »