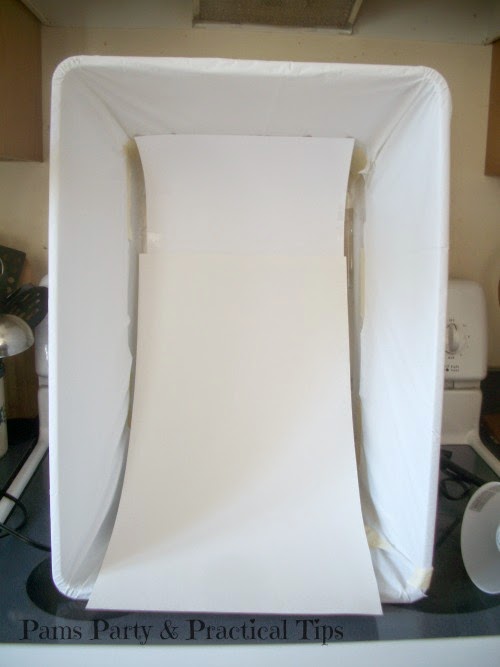
To make a light box, you need a clear container, a white plastic tablecloth or thin white cloth, 3 lights, and a piece of white poster board. I found everything I needed for around $25 at Target.
The first step is to cover with container with the plastic or cloth and secure with tape. I used masking tape, but I might go back and use clear packing tape. You do not need to cover the bottom of the box with the plastic, because you will be covering it at a later time.
Measure the bottom of your box, and cut the poster board to fit inside. I accidentally cut my poster board from the wrong direction so it was a little bit on the short side. I added a piece of card stock to the top which is fine when I need to take pictures of smaller items because it won't be seen. If I want to take wider pictures,that will not be a problem either. Sit the box on it's side and cut a wider piece of poster board to fit the width of the box. Make sure though that it is long enough to cover the bottom of the box, so you have a place to sit the item you are photographing.
I found these clip lights for $5.99 in the light aisle. I only bought two because I already have a desk lamp with an adjustable next to use on one side. I aimed each of the side lights into the box.
I clipped one of the lights to the top of the box, and aimed it down.
I went in my craft room, and found my cute little Easter Treat Boxes . I thought they would be a good thing to photograph, especially with Easter coming up soon. This is one of the pictures I took with the light box. It is unaltered with the exception of my watermark. I think I need to lower the lights a little bit more, but I do like how the photo turned out.
This picture is the combination of the light box, and applying an auto adjust to the photo. No other altering was done. I really like how bright this photo turned out.
I took this picture in natural light on my kitchen table. I noticed there were more shadows when taken in natural light. I will have to see how it works in the evening with even less light, but for now I am happy with how the light box is working.
I will be linking up my Light Box Tutorial on the following linky parties here.


That is a great idea! I made one out of a large cardboard box that I cut the sides out of. Then I covered the openings with tissue paper. It works ok, but is very fragile. I love the idea of using a plastic container. Pinning this one!
ReplyDeleteThank you Jeanette.. I had thought about making one out of cardboard and tissue, but I was not looking forward to cutting out the cardboard.. Thanks so much for pinning!
DeleteI made a light box from a cardboard box and cut out most of 3 sides, then covered with light white fabric. It lasted a few months and then the sides caved it. I just threw it out last week. Anyway, this is a much better idea! Thanks. Linda crafts a la mode
ReplyDeletePinning also to Blog Stuff.
I am glad to hear that this post came at the perfect time for you to try. Thanks so much for pinning my post.. :)
DeleteThis is freakin BRILLIANT, Pam! I am an ebay seller and I struggle to find a way to photograph things as well. I've been using tri-fold project board and it work....OK. This is a quick and easy solution. Thanks!
ReplyDeleteThank you for the nice compliment, but I really can not take the credit. :) A blogger that I know mentioned she made one from a plastic container that worked, this is just my version of how to make one inexpensively. I am glad it will help.
DeleteI love this idea. I would love it if you joined and contribute your awesome posts at my link party at City of Creative Dreams on Fridays :D
ReplyDeleteI've seen a few home made light boxes about and really do need to sort myself out with one. I love how you've shown the difference it makes. Improving my photos is definitely something I need to work on.
ReplyDeleteThen I'll need to find a decent background for bigger things that won't fit in a light box! Still, one thing sat a time, baby steps!
Making a light box has been on my to-do list for some time. You have motivated me to tackle that project.
ReplyDeleteIt was on mine to do list for a long time too.. Then once I did it, I wondered what took me so long.. Glad I could help. :)
DeleteI also need to make a light box.... some day. Thank you for the tutorial. It looks doable.
ReplyDeleteThank you for sharing at the Anything Goes Bacon Time weekly linky. You are incredible. Great work on the light box. I bought one a long time ago. I need to pull it out of storage, so I will use it more.
ReplyDeleteThis comment has been removed by the author.
ReplyDelete